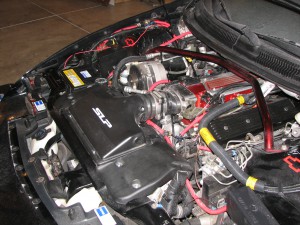
This document is for informational purposes only. The following modification is assumed to be at your own risk and of no liability to the author. It also assumes you already have good fabrication ability and sense, because you will need it. When properly done, this modification not only looks good, but it can also offer an additional 10-20 peak horsepower (my own estimate) over a tradtional CAI along with improved throttle response and gas mileage!
My full collection of full-sized pictures are available here if you are seeking more detail than shown in this writeup: http://www.joelrdevriendt.com/files/public/automotive/95_camaro/ls1_lid/
1. Supplies Needed
- LS1 Air Lid
- LS1 Radiator Support (NOT the high-rise WS6 version)
- LS1 Air Cleaner & Basket (basket optional depending on how you choose to do this)
- (1) 3″ to 3″ Fernco coupler, available at Lowes, Home Depot, etc in the plumbing section
- (2) additional hose clamps if using a non-SLP lid (MAF can be inserted directly into the SLP lid)
- (4) 3/8″ self-tapping bolts for the radiator support
- (2) 1/4″ self-tapping screws to secure the lid to the cross member
- A dremel with plenty of cutoff wheel bits, as well as the plastic trimming bit pictured later on.
2. Install LS1 Lid
The guide I used to install the lid can be found here:
http://www.lt1engine.com/tech/ls1-lid-on-a-lt1-using-stock-camaro-hood/
The install begins the same way any other LT1 lid install has been done – laying the radiator back. You will want to begin by removing your factory radiator support. If you have an A/C condenser you will need to pull it out of its mounting tabs on the radiator so that the two devices will be able to articulate in relation to one another. If you have an electric water pump as I did, you will need to trim your fan shroud. This modification may not be possible with some electric pumps, as my CSR offered just enough clearance for the fan.
You need to the radiator back enough that your filter will set down into the back half of the core support. You can decide whether you want to make your cut in the radiator support to fit the filter basket, or just the filter. I chose just the filter, but using the basket might provide a better seal in some cases. You will also need to verify the alignment of the filter with the lid and the throttle body.
Below is the result of the cut. You will notice that I also bent the top edge of my radiator forward in order to achieve a confident support of the air filter against the lid. This also serves to snug the filter up against the core support as well. Again, if you are not happy with how the air filter fits against your lid, I advise cutting the core support out some more so that you can fit the LS1 filter basket in also. In my case I was surprised to find it unnecessary.
The next step is installing the lid. Get the lid itself, the fernco connector, and the 2-4 hose clamps ready. There are two ways to set this up:
- Use a single coupler from the throttle body to the MAF and insert the MAF directly into the lid (lid will probably require trimming).
- Use two couplers, one on either side of the MAF.
I chose option #2, and in hindsight I feel that inserting the MAF directly into the lid is the better option. However, I will include the instructions for the alternative method anyway. To make my two couplers, I cut my single piece of fernco in half down the center, since there is a limited amount of space between the lid and the throttle body. I was able to make a nice even cut by using masking tape as a guide. It is best to make your cut on an angle, so as to accommodate for the angle of the lid inlet. The lid, being designed to fit a higher filter mount, has more angle than necessary, so you will need to trim that down to get it closer to alignment also. Here are some pictures:
Now that the lid is in place you may need to drill a hole in the lid for the IAT sensor. Also make sure your MAF is connected, you may need to modify/extend the wiring harness to get it to reach in this position. I was able to rotate my MAF such that I didn’t need to. Once the fitament is verified you can start on the radiator support. It is probably best not to screw the lid down yet at this point, just to be safe.
2. Installing the LS1 radiator support
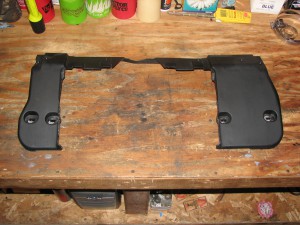
Here is what you’ll be starting with:
here is the bit that i used for 95% of the trimming, it cuts through plastic quite well:
This process is going to take a lot of trimming and lot of patience. The first piece you’ll want to remove is the front cross-brace, since it will not fit under the stock hood. You’ll also want to remove ALL plastic that sits beneath the filter, and even then some further back. I cut the support back to the start of the lid clips, which will actually line up with the lid quite well when you are finished.
You will also need to clearance the back of the support to clear the fernco connection and MAF. From the top, your end result should look something like this:
When you are done, the lid should fit inside the support:
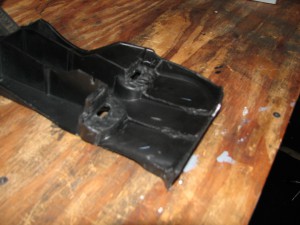
Next, you have to trim the underside of the support. Keep in mind that you will be positioning the radiator support an inch or so back from the normal position, to accommodate for the repositioned radiator. You will still be able to use the screw-holes in the radiator support, but the screws will be tapped into the very back edge of the core support. Take note of the trimming I did near the bolt-holes, the remaining plastic behind the bolts is good for strength.
Here is how I trimmed the underside of the support:
For a clean install you will need to cut the side edges to fit snugly around the core support. This best done by trial and error:
Lastly, check your fitament with the filter. (You’ll want to remove the lid for this). If the radiator support doesn’t fall into place perfect don’t freak yet, it will snug up when you tighten down the screws.
If everythings good, get your 3/8″ self-tapping bolts and washers and fasten it to the core support. Use self-tapping screws to secure the front of the lid to the support. The following pictures should help show where the self-tapping screws are positioned in the core support (very back edge):
After that, put the lid back on and use your 1/4″ self-tapping screws to secure the front edge of the lid.
The only thing left is making your hood close. This will require removing part of the bottom layer of your hood skin. Here are some pictures of the trimming I did to make the hood close. I put grease on the lid to mark the bottom of the of the hood where trimming was needed. I still plan on making this part look “prettier” but these pictures will work for now:
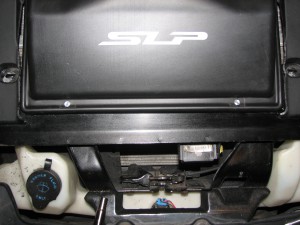
You’re done! Enjoy your engines new ability to breathe!
Here are a few more angles of the finished product:


